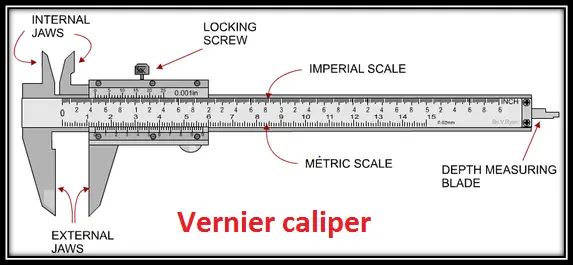
We would be giving a lot of information on physics practicals for class 11. Here we would be concentrating on Vernier caliper
Introduction
Vernier caliper is introduced in 1631 by Pierre Vernier of France. It is an instrument for making very accurate linear measurements It utilizes two graduated scales: the main scale similar to that on a ruler and an especially graduated auxiliary scale, the vernier, that slides parallel to the main scale and enables readings to be made to a fraction of a division on the main scale.

Principle
The vernier scale is constructed so that it is spaced at a constant fraction of the fixed main scale. So for a decimal measuring device, each mark on the vernier would be spaced nine-tenths of those on the main scale. If you put the two scales together with zero points aligned then the first mark on the vernier scale will be one-tenth short of the first main scale mark, the second two tenths short and so on up to the ninth mark which would be misaligned by nine-tenths. Only when a full ten marks have been counted would there be an alignment because the tenth mark would be ten tenths, that is a whole main scale unit, short and will therefore align with the ninth mark on the main scale.
Now if you move the vernier by a small amount, say, one-tenth of its fixed main scale, the only pair of marks that come into alignment will be the first pair since these were the only ones originally misaligned by one-tenth. If we had moved it 2 tenths then the second pair and only the second would be in alignment since these are the only ones that were originally misaligned by that amount. If we had moved it 5 tenths then the fifth pair and only the fifth would be in alignment. And so on for any movement, only one pair of marks will be in alignment and that pair will show what is the value of the small displacement.
So if 5th pair is matching then 5/10 will the displacement
How to use it
Let’s see how it works when Nine mail scale divisions are equated to 10 vernier scale divisions( 1 small division on the main scale=1mm)
1)Make sure that whatever you are measuring is clean and has no burrs on the edges.
2) Open the jaws of the caliper and position them on both sides of the piece you are measuring. Push the jaws firmly against the workpiece. Lock the clamp screw so that the jaws don’t move
3)On the vernier scale is a small number 0 look and See how many smaller (numbered) divisions the small 0 has gone past. This represents how many mm in the number of the object
5) Look and see what division line on the vernier scale best lines up with a division on the bar scale. This is how many tenths of an mm.
7)By adding the mm measurement, the tenths of an mm, you will have a measurement with good accuracy
Uses
Vernier calipers are widely used in scientific laboratories and in manufacturing for quality control measurements. The vernier caliper is used in length measurements to gain an additional digit of accuracy compared to a simple ruler.
Multiple Choice Questions
Question 1
The least count, of a conventional laboratory vernier caliper, is 0.01 cm. If in a given measurement, the main scale reading is 2.4 cm and the 5th division of the vernier scale coincides with the main scale decision, the reading of the vernier caliper, is
(a) 2.35cm
(b) 2.40 cm
(c) 2.45cm
(d) 2.50cm
Question 2
The diameter of a very thin wire is to be measured by finding the thickness of a collection of, say 10, of these wires. The instrument, that should be preferred for this purpose, is
(a) measuring tape
(b) vernier calipers
(c) screw gauge
(d) meter scale
Question 3
The sliding ‘jaws’ of vernier calipers can be used for
(a) Measuring the depth of a beaker
(b) Measuring the length of a wire
(c) Measuring the internal diameter of a hollow cylinder
(d) Measuring the diameter of a sphere
Question 4
The vernier scale of a microscope has 50 divisions. These coincide with 49 divisions on its main scale, which is graduated up to ½ of an mm. The least count of the vernier scale would
be
(a) 1/50 mm
(b) 1/100 mm
(c) 49/50 mm
(d) 49/100 mm
Question 5
Given vernier calipers has a zero error of + 0.04 cm. The diameter of a rod, as read by this vernier, is 1.24cm. The corrected diameter of the rod is
(a) 1.20 cm
(b) 1.20 mm
(c) 1.28 mm
(d) 1.28 cm
Answer
1. (c)
2. (c)
3. (d)
4. (b)
5. (a)
Viva Voice Questions
- Define vernier constant?
- What is the principle of a vernier?
- How is zero error applied?
- What is an angular vernier?
- How is the least count of vernier calipers determined?
- What are the common sources of the error occurring in using a vernier?
- What are the precautions to be observed while using vernier?
- What is a parallax error? How can it be avoided?
- What is the utility of vernier calipers?
- How will you determine the volume of an irregular glass plate using an vernier?

To find the diameter of a metal using varnier calipers